
What is GPIO? A Complete Guide for Mini PC Users
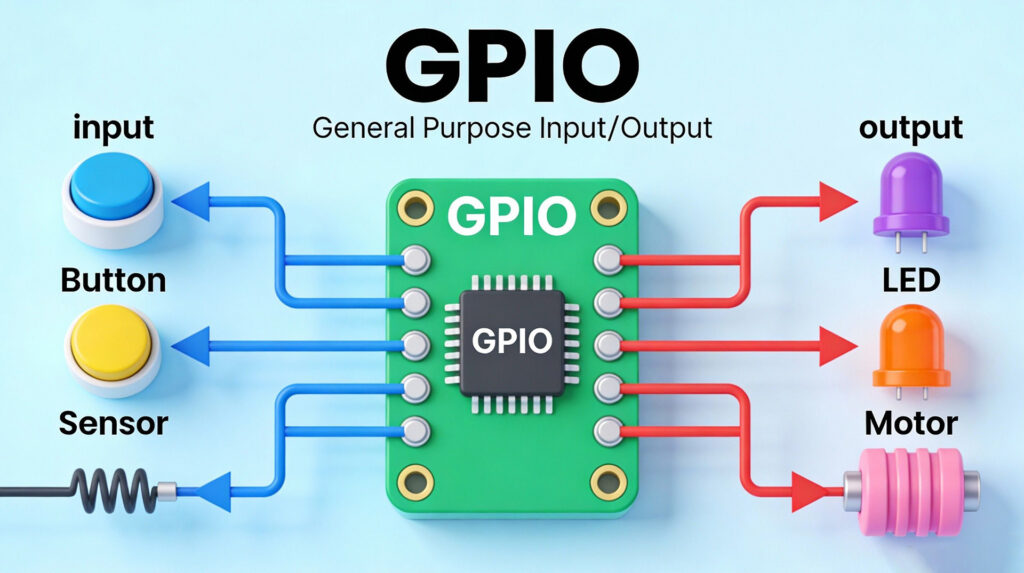
What is GPIO? A Complete Guide for Mini PC Users Announcements Buyer Guide Comprehensive Tips Occasion Product Review Q&A Tutorials What It Is and Why It Matters for Mini PCs In the world of mini PCs, there are numerous features that enhance their versatility, and GPIO is undoubtedly one of the most valuable for tech enthusiasts, hobbyists, and even small-scale industrial users. But what exactly is GPIO? For those new to the term, GPIO might sound like technical jargon, but its core concept is straightforward. In this comprehensive guide, we’ll break down everything you need to know about GPIO, focusing specifically on its relevance to mini PCs—from basic definitions to practical applications. Whether you’re looking to build a home automation system, a custom monitoring device, or simply expand your mini PC’s capabilities, understanding GPIO is the first step. GPIO, short for General-Purpose Input/Output, refers to a set of programmable pins on a computer’s motherboard (or single-board computer, which is the foundation of most mini PCs). Unlike dedicated ports (such as USB, HDMI, or Ethernet) that have fixed functions, GPIO pins can be configured by the user to act as either input or output devices. This flexibility is what makes GPIO so powerful. Typically, a mini PC’s GPIO header consists of multiple pins (common configurations include 16-pin, 20-pin, or 40-pin setups), each of which can be controlled via software (such as Python, C++, or specialized GPIO management tools). The voltage levels of GPIO pins are usually standardized—most mini PCs use 3.3V or 5V, which is important to note to avoid damaging connected components. Key Characteristics of GPIO Pins on Mini PCs To fully grasp how GPIO works with your mini PC, it’s essential to understand its key characteristics. These features determine how you can use GPIO pins and what types of projects they’re suitable for: Programmability: As mentioned earlier, the biggest advantage of GPIO is its programmability. Users can define the function of each pin (input or output) through code or configuration tools. For example, you can set a pin to detect the signal from a motion sensor (input) or control the on/off state of an LED light (output). Voltage Compatibility: Most mini PC GPIO pins operate at 3.3V, while some may support 5V. It’s crucial to check your mini PC’s specifications before connecting external devices—using a 5V device with a 3.3V GPIO pin can cause permanent damage to your mini PC’s motherboard. Pin Count: The number of GPIO pins varies by mini PC model. Entry-level mini PCs may have 16 or 20 GPIO pins, while high-performance models designed for industrial use may offer 40 or more. More pins mean more opportunities to connect multiple external devices simultaneously. Multifunctional Modes: Many GPIO pins on modern mini PCs support additional modes beyond basic input/output. These include I2C (Inter-Integrated Circuit), SPI (Serial Peripheral Interface), and UART (Universal Asynchronous Receiver/Transmitter), which are communication protocols that allow your mini PC to interact with a wide range of sensors, actuators, and other electronic components. The HYSTOU H6 fanless mini PC has a 14-pin GPIO interface. Pins 0-4 work as output pins. Pins 5-9 support both input and output. This gives stable, reliable hardware expansion for daily hobby projects and small applications. The mini host also comes with various other interfaces. These meet more diverse usage needs. Practical Applications of GPIO on Mini PCs GPIO’s versatility opens up a world of possibilities for mini PC users. Here are some of the most popular and practical applications to inspire your next project: Home Automation One of the most common uses of GPIO is building home automation systems. With your mini PC and a few external components (such as relays, sensors, and actuators), you can control lights, fans, thermostats, and other home appliances remotely. For example, you can connect a motion sensor to a GPIO pin to trigger lights when someone enters a room, or use a temperature sensor to automatically adjust your HVAC system. Many users choose mini PCs for home automation because they’re compact, energy-efficient, and can run 24/7 without consuming much power. Custom Monitoring Systems GPIO pins are perfect for creating custom monitoring devices. Whether you want to monitor the temperature and humidity of your greenhouse, the water level in a tank, or the power consumption of your home, GPIO can help. By connecting sensors to your mini PC’s GPIO pins, you can collect real-time data, store it in a database, and even set up alerts for abnormal conditions. For example, a small business owner could use a mini PC with GPIO to monitor the temperature of a walk-in cooler—if the temperature rises above a certain threshold, the system can send an email or SMS alert to the owner. Hobbyist and Educational Projects GPIO is an excellent tool for hobbyists and students who want to learn about electronics and programming. From building a simple LED blinker to a more complex robot or weather station, GPIO provides a hands-on way to learn how hardware and software interact. Many educational institutions use mini PCs with GPIO for STEM courses, as they’re affordable and easy to use. Additionally, there’s a large community of hobbyists online who share project tutorials and code snippets, making it easy to get started even if you have no prior experience. How to Get Started with GPIO on Your Mini PC Getting started with GPIO is easier than you might think. Here’s a step-by-step guide to help you begin: Check Your Mini PC’s GPIO Specifications: First, refer to your mini PC’s user manual or official website to confirm the number of GPIO pins, voltage levels, and supported communication protocols. This will help you choose compatible external components. Gather the Necessary Tools and Components: You’ll need a few basic tools, such as a breadboard, jumper wires, and external components (like LEDs, sensors, or relays). These are widely available online and are relatively affordable. Choose a Programming Language or Tool: Most mini PCs support programming languages like Python, which is beginner-friendly and has a large number of
What is GPIO? A Complete Guide for Mini PC Users Read More »