How to Turn a Mini PC into a Powerful Home NAS: 2026 Full Guide for Beginners & Advanced Users
You want a secure home storage solution for family photos, work documents, and 4K movies. But branded NAS devices like Synology or QNAP come with a high premium, even for entry-level 2-bay models.
You have an unused mini PC sitting in a drawer, wasting away, with no idea that it can become a fully customizable, high-performance home NAS.
You want to build a private cloud, media server, or smart home hub, but are put off by complex tutorials and high costs.
We break down the core advantages of a mini PC over a branded NAS, explain the hardware selection logic in depth, give you copy-paste step-by-step setup instructions, and share must-know pitfalls for beginners.
We’ll also reveal the best mini PC for NAS in 2026, to help you avoid costly mistakes.
Why Choose a Mini PC as Your NAS? Core Advantages Over Branded NAS
First and foremost, let’s clear up a common question: Is a mini pc good for a NAS?
The short answer is yes. For 95% of home users, a mini pc as a NAS is a better choice than a branded NAS. Here’s why.
1. Unbeatable Cost-Effectiveness, No Brand Premium
Let’s do a direct comparison.
An entry-level 2-bay branded NAS costs $250-$350, hard drives not included. It only offers basic functions, locked firmware, and limited expandability.
A brand-new mini PC optimized for NAS costs $100-$200. It delivers better performance, full customization, and far more expansion options.
If you use an old, unused mini PC? Your base cost is almost zero. You only need to add hard drives.
2. Unlimited Expandability, No Brand Restrictions
Branded NAS locks you into fixed drive bays, limited RAM, and proprietary hardware.
A mini pc for NAS has no such limits.
You can upgrade RAM, add multiple SSDs/HDDs, upgrade network ports from 1Gbps to 2.5Gbps, and even add expansion cards for more storage.
It grows with your needs, no need to buy a whole new device when your storage demands increase.
3. Full Functional Freedom, One Device for Multiple Uses
A branded NAS is designed for one core job: storage.
A mini pc as NAS can do so much more.
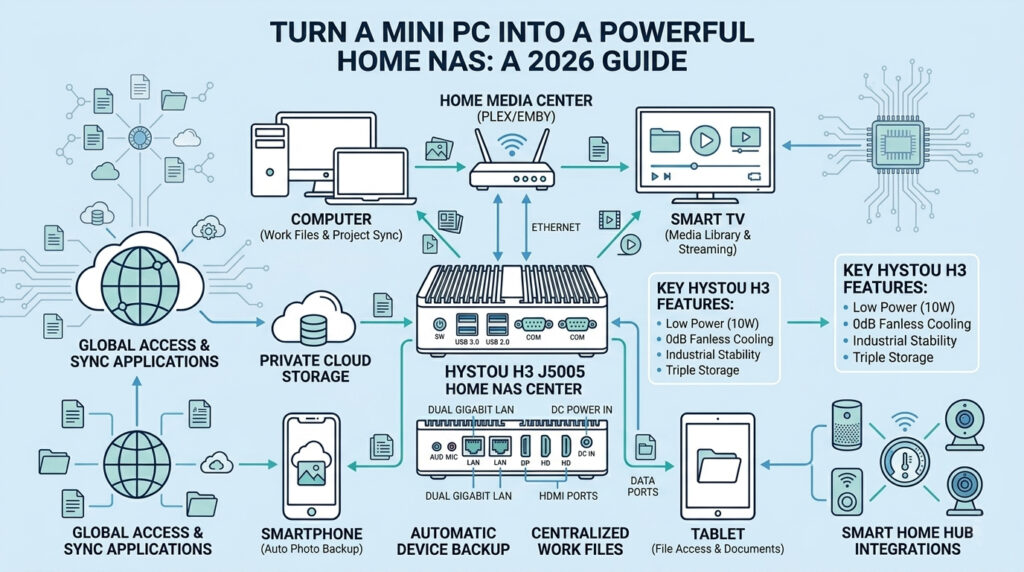
With one device, you can run a file server, a Plex/Emby media server, a Home Assistant smart home hub, an AdGuard Home ad blocker, and even virtual machines.
You don’t need multiple devices cluttering your home. One mini PC does it all.
4. Low Power & Silent Operation, Perfect for Home Use
Most home users run their NAS 24/7. Power consumption and noise matter.
Modern mini PCs for NAS use low-power processors, with a TDP of 6-15W. Full system idle power is only 10-20W.
That means annual electricity costs as low as $15-$30, even for non-stop operation.
In contrast, branded NAS with active fans and higher power draw can cost 2-3x more to run every year.
2026 Hardware Selection Criteria for a Mini PC NAS
Many beginners make a critical mistake: they chase the highest CPU performance for their NAS.
This is completely wrong.
The core requirements for a home NAS are 24/7 stable operation, low power consumption, and silent running. High-performance CPUs bring unnecessary heat, noise, and electricity costs.
Here are the exact criteria you need to follow to pick the best mini PC for a NAS.
1. CPU: Low Power & Stability First, Not Raw Performance
For a home NAS, you don’t need an Intel Core i7 or AMD Ryzen 7 processor.
The ideal choice is an Intel Celeron J/N series or Pentium Silver processor. These chips have a TDP of 6-15W, 4 cores/4 threads, and built-in integrated graphics for hardware video transcoding.
They handle all core NAS tasks with ease, while keeping power and heat to a minimum.
2. RAM: Not More is Better, Enough With Headroom is Key
- Minimum: 8GB DDR4/DDR5 (for basic file storage only)
- Recommended: 16GB (for most home users, with media services and plugins)
- Advanced: 32GB+ (for virtualization, multiple concurrent services)
ECC RAM is a bonus for data integrity, but not required for most home users.
3. Storage Expansion: The Heart of Your NAS
The golden setup for NAS is:
- A dedicated SSD for the operating system (128GB-256GB minimum)
- One or more large HDDs/SSDs for data storage
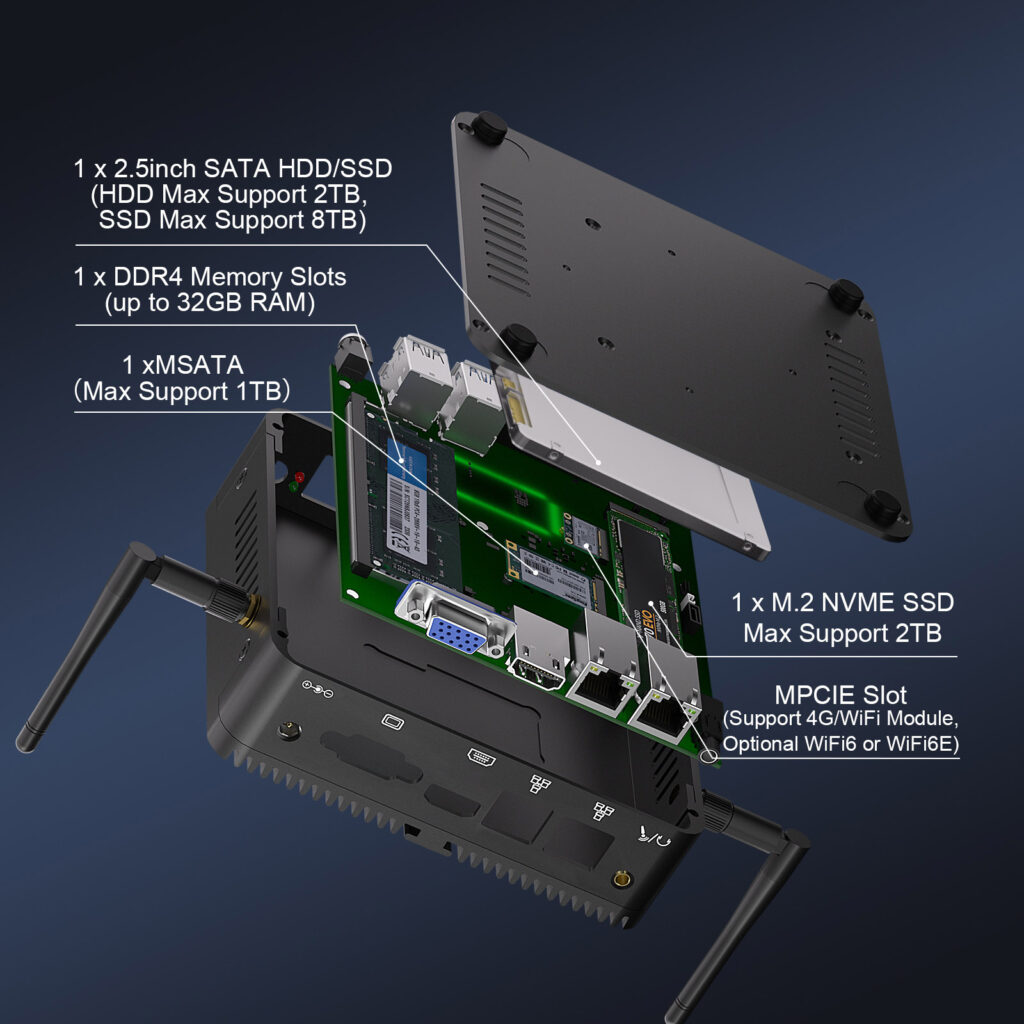
- An optional backup drive or cache drive. Look for a mini PC with M.2 NVMe, mSATA, and 2.5-inch SATA ports. These give you the most flexibility for your storage setup.
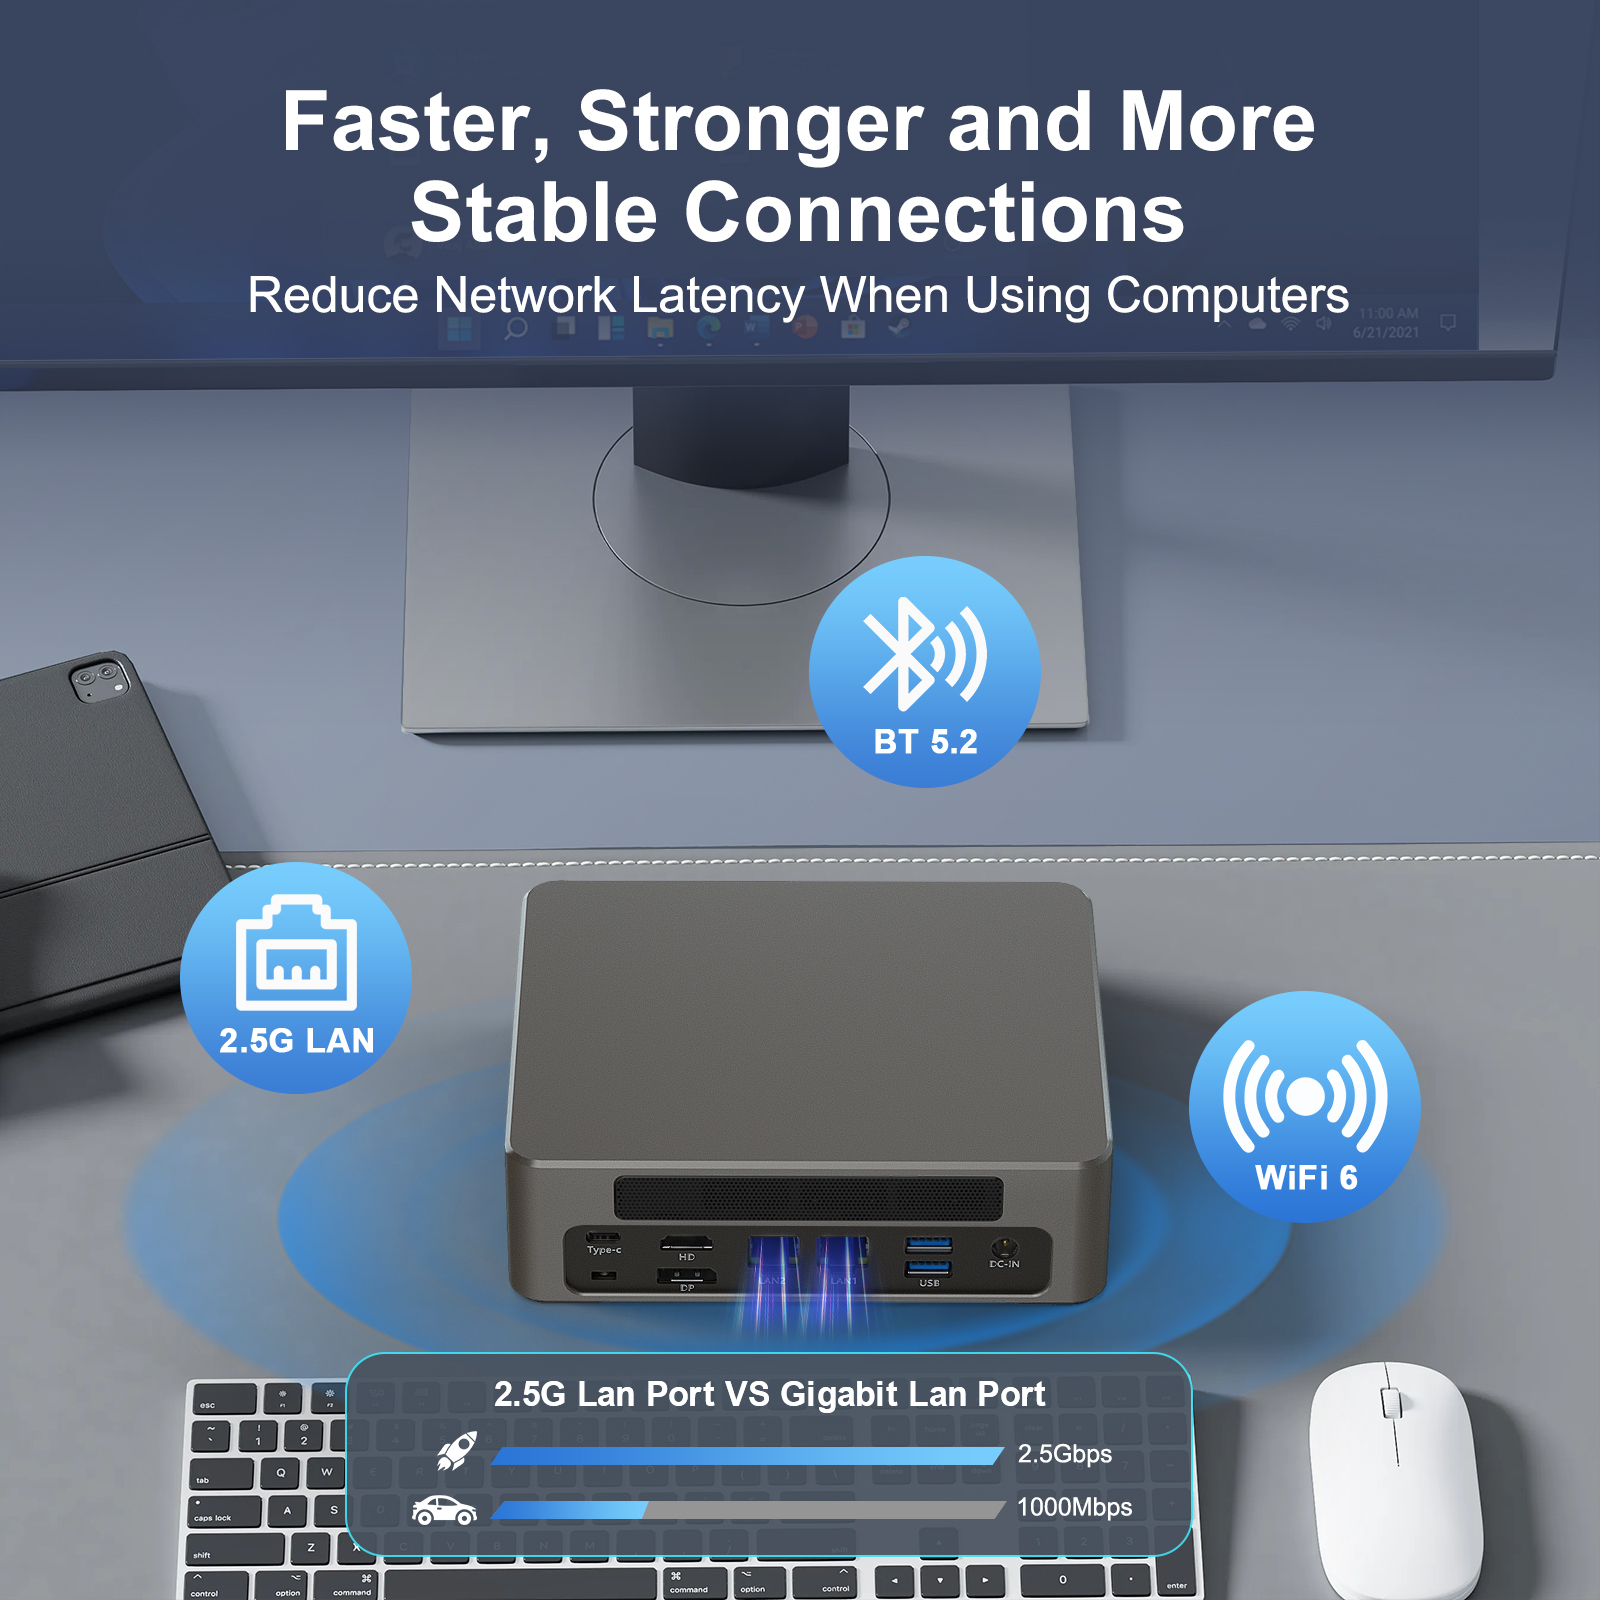
4. Network: The Upper Limit of Your File Transfer Speed
- Minimum: 1x Gigabit Ethernet (1Gbps) port
- Recommended: 2x Gigabit or 2.5Gbps Ethernet ports
Dual ports support link aggregation, network redundancy, and internal/external network isolation. They eliminate bandwidth congestion when multiple devices access the NAS at the same time.
5. Cooling & Power: The Key to 24/7 Stable Operation
For a 24/7 NAS, cooling and power reliability are non-negotiable.
A fanless mini pc for NAS is always the best choice for home use. No fan means zero noise, no dust buildup, and no mechanical parts to fail.
For power, look for a mini PC with stable DC power input, auto power-on after outage, and Wake on LAN (WOL) support. These are must-have features for a reliable NAS.
- Silent & Reliable Operation: Fanless full aluminum alloy chassis delivers 0dB noise during 24/7 running, eliminates fan failure and dust accumulation risks, and works stably in -20℃ to 50℃ extreme environments
- Ultra-Low Power Consumption: Equipped with a 10W TDP Intel Pentium Silver J5005 4-core processor, the annual electricity cost is less than $20 for non-stop operation, with built-in Intel UHD Graphics 605 supporting 4K hardware video transcoding for media servers
- NAS-Optimized Storage Expansion: 3 storage interfaces fit the golden NAS architecture perfectly: 1× M.2 NVMe SSD slot (max 2TB) for OS installation, 1× mSATA slot (max 1TB) for data backup/cache, 1× 2.5-inch SATA 3.0 port for bulk file and media storage
- Stable High-Speed Network: Dual Gigabit Ethernet ports support link aggregation and network redundancy, ensuring congestion-free file transfer when multiple devices access the NAS at the same time
- Full NAS Essential Features: Built-in auto power-on after power outage, Wake on LAN (WOL), crash-recovery watchdog function, and TPM 2.0 security chip for hardware-level data protection
Which NAS OS Should You Choose? Full Guide for All User Levels
The right OS makes or breaks your mini pc NAS experience. Here’s our breakdown of the most popular options for beginners to advanced users.
1. Beginner’s Top Pick: OpenMediaVault (OMV)
OMV is the best choice for new users. It’s free, open-source, lightweight, and built exclusively for NAS.
It has an intuitive web-based management interface, one-click plugin installation, and native support for SMB/CIFS, NFS, and FTP file sharing. It runs perfectly on low-power mini PCs like the HYSTOU H3.
2. Data Security First: TrueNAS SCALE
If you’re storing irreplaceable photos, work documents, or critical data, TrueNAS SCALE is the gold standard.
It uses the ZFS file system, which delivers end-to-end data integrity, automatic checksums, and built-in RAID protection. It prevents bit rot and data loss, even if a drive fails.
3 Media & Multi-Drive Friendly: Unraid
Unraid is the top choice for media server users. It’s incredibly flexible with hard drives — you can mix and match drive sizes, add drives at any time, and it has native support for Docker and virtual machines.
It has a one-click Plex/Emby installer, making it perfect for media-focused NAS builds.
4. Advanced Multi-Use: Proxmox VE (PVE)
If you want to run multiple services on your mini PC — NAS, media server, soft router, virtual machines — Proxmox VE is the best option.
It’s a Type 1 hypervisor that lets you create virtual machines and containers for each service. You can isolate your NAS system from other services for maximum stability and security.
Step-by-Step Guide to Build Your Mini PC NAS
Follow these steps, and you’ll have a fully functional mini pc NAS up and running in under an hour. Even if you’re a complete beginner, you won’t make a mistake.
Preparations: Tools & Materials You Need
- Your mini PC (we recommend the HYSTOU H3)
- SSD for the OS (128GB-256GB minimum)
- HDD/SSD for data storage
- 8GB+ USB flash drive
- Gigabit/2.5G Ethernet cable
- Temporary monitor, keyboard, and mouse (only for initial setup)
Step 1: Hardware Installation & BIOS Configuration
Then, power on the device and enter the BIOS (press DEL/F2 during boot).
Critical BIOS settings for NAS:
- Set the boot mode to UEFI
- Enable Auto Power-On (restart after power outage)
- Enable Wake on LAN (WOL)
- Disable sleep/hibernation mode
- Enable virtualization (VT-x/AMD-V) if you plan to use VMs
Save the settings and restart.
Step 2: Create a Bootable Drive & Install the NAS OS
Download your chosen NAS OS ISO file (we recommend OMV for beginners) from the official website.
Use Rufus or BalenaEtcher to write the ISO file to your USB flash drive.
Insert the bootable USB into your mini PC, boot from the USB, and follow the on-screen prompts to install the OS.
Critical Pitfall to Avoid: Always install the OS on your dedicated SSD, never on a data hard drive. This prevents system lag and drive failure.
Step 3: Network Configuration & Static IP Setup
After installation, remove the USB drive and restart the mini PC.
Check your router’s device list to find the IP address of your mini PC.
Enter that IP address into a web browser on another device to access the NAS web management interface.
Must-Do Step: Set a static IP address for your NAS. This prevents the IP from changing after a restart, so you can always access your NAS reliably.
Step 4: Storage Pool Creation & Drive Mounting
This is the step where most beginners make mistakes.
First, navigate to the storage section of your NAS OS.
Format your data drives (we recommend ext4 for OMV, ZFS for TrueNAS).
Create a storage pool, then mount the drives to the system.
Enable auto-mount on boot, so your drives are always available when the NAS restarts.
Step 5: Enable File Sharing & Cross-Device Access
Next, enable the SMB/CIFS service (compatible with Windows, Mac, Android, iOS, smart TVs, and streaming devices).
Create shared folders for different uses — family photos, work documents, media library, etc.
Set read/write permissions for each folder to control who can access and edit your files.
Step 6: Remote Access & Security Hardening
For security:
- Enable SSH key login, disable password login
- Set up a firewall, and only open the ports you need
- Regularly update the OS and plugins
- Set up automated backups for your critical data
Long-Term Maintenance Guide: Keep Your NAS Stable for 5+ Years
- Update the OS and plugins regularly to fix security vulnerabilities
- Enable hard drive hibernation for idle drives, to extend drive lifespan and save power
- Set up automated backups for critical data, follow the 3-2-1 backup rule
- Keep the mini PC in a well-ventilated area, and prevent overheating
- Check drive health monthly, using built-in SMART monitoring tools
FAQ
Q: Is a mini pc better than a Synology for home use?
A: For most users, yes. A mini pc as NAS offers better performance, more customization, lower cost, and more expandability than a similarly priced Synology. The only exception is if you want a completely plug-and-play experience with no setup.
Q: Can a fanless mini pc run 24/7 as a NAS?
A: Absolutely. Fanless mini PCs like the HYSTOU H3 use passive cooling with a full aluminum chassis. They dissipate heat efficiently and have no moving parts to fail. They’re designed for 24/7 industrial operation, so they’re perfect for home NAS use.
Q: What’s the minimum configuration for a mini pc NAS?
A: For basic file storage: 4-core low-power CPU (J4125/J5005/N100), 8GB RAM, 128GB SSD for OS, 1x Gigabit Ethernet port. For most home users, we recommend 16GB RAM and dual Gigabit ports for better performance.

HYSTOU
HYSTOU has established its R&D headquarters in Shenzhen, drawing on over a decade of experience. Our core team members, who previously served at renowned companies such as Inventec and Quanta Computer, form the backbone of our technical expertise. With robust R&D and innovation capabilities, we remain steadfast in our commitment to pursuing excellence in the field of technology products.