Ultimate Mini PC Upgrade & Maintenance Guide: Boost Performance & Extend Lifespan

Mini PC Hardware Upgrade: Step-by-Step RAM and SSD Installation
Upgrading your mini computer’s hardware is one of the most effective ways to boost performance without replacing the entire device. Whether you want to enhance multitasking capabilities or improve storage speed, this section provides clear instructions to guide you through the entire process. Similarly, the following tutorial applies equally to HYSTOU Mini PCs.
How to Upgrade RAM in Your Mini PC
Random Access Memory (RAM) is crucial for smooth multitasking and running memory-intensive applications. Most modern Mini PCs allow RAM upgrades, and the process is surprisingly simple.
Step 1: Prepare Your Workspace
Ensure you have a clean, static-free surface to work on.
Power off your Mini PC and unplug all cables.
Ground yourself by touching a metal object to discharge any static electricity.
Step 2: Access the RAM Slots
Depending on your Mini PC model, you may need to remove a back panel or access door.
Use a Phillips-head screwdriver to remove any screws securing the panel.
Locate the RAM slots on the motherboard.
Step 3: Remove Existing RAM (if necessary)
Press down on the clips at either end of the RAM module.
The module should pop up at a 45-degree angle.
Gently pull the RAM module out of the slot.
Step 4: Install New RAM
Align the notch on the RAM module with the notch in the slot.
Insert the module at a 45-degree angle.
Press down firmly until the clips snap into place.
Step 5: Reassemble and Test
Replace the back panel and secure with screws.
Reconnect all cables and power on your Mini PC.
Verify the new RAM is recognized by checking your system properties.
Important Considerations:
Check your Mini PC’s specifications for maximum RAM capacity and supported speeds.
For dual-channel performance, install RAM modules in pairs of the same size and speed.
If you’re unsure about compatibility, consult your device’s user manual or manufacturer’s website.
SSD Installation Guide for Faster Storage
Upgrading to a Solid State Drive (SSD) can dramatically improve your Mini PC’s boot time and application loading speeds. Follow these steps to install an SSD:
Step 1: Choose the Right SSD
Most Mini PCs use M.2 NVMe or 2.5-inch SATA SSDs.
Check your device’s specifications to determine the correct form factor and interface.
Step 2: Backup Your Data
Before starting, ensure all important data is backed up to an external drive or cloud storage.
Step 3: Install the SSD
For M.2 SSDs:
Locate the M.2 slot on the motherboard.
Remove the screw securing the slot cover (if present).
Insert the SSD at a 45-degree angle.
Press down and secure with the screw.
For 2.5-inch SATA SSDs:
Locate the 2.5-inch drive bay.
Mount the SSD using the provided screws.
Connect the SATA data cable and power connector.
Step 4: Clone or Install Operating System
Option 1: Clone your existing drive using software like Samsung Data Migration.
Option 2: Perform a clean installation of your operating system.
Step 5: Verify Installation
Power on your Mini PC and check if the SSD is recognized.
Verify the drive’s health and performance using tools like CrystalDiskInfo.
Pro Tip: For optimal performance, ensure your SSD is properly aligned and enabled for TRIM support in your operating system.
Mini PC Cooling Solutions: Keeping Your Device Running Smoothly
Proper cooling is essential for maintaining your Mini PC’s performance and longevity. With their compact size, Mini PCs can be prone to overheating if not properly managed.
Active Cooling vs. Passive Cooling
Active Cooling Systems:
Utilize fans to actively move air through the device.
More effective at dissipating heat during heavy workloads.
May produce noise, though many modern Mini PCs feature quiet fan designs.
Passive Cooling Systems:
Rely on heat sinks and thermal conduction.
Completely silent operation.
Ideal for noise-sensitive environments but may not handle sustained heavy loads as well.
Top Cooling Solutions for Mini PCs
Improved Case Fans
Upgrade to high-performance, low-noise fans like Noctua NF-A9x14.
Consider PWM (Pulse Width Modulation) fans for dynamic speed control.
Thermal Paste Replacement
Over time, thermal paste can dry out and lose effectiveness.
Replace with a high-quality thermal compound like Arctic MX-5.
External Cooling Fans
USB-powered cooling fans can provide additional airflow.
Products like the Cooler Master Notepal X3 offer adjustable fan speeds.
Liquid Cooling (for advanced users)
Some high-end Mini PCs support compact liquid cooling solutions.
The Asetek 690LC is an example of a Mini-ITX compatible liquid cooler.
When upgrading the cooling system, first determine if your mini PC currently has a fan. HYSTOU offers numerous fanless models that deliver efficient heat dissipation with ultra-quiet operation. Always compare the exact dimensions of your device before selecting an upgrade component to ensure compatibility.
Maintenance Tips for Optimal Cooling
Regularly clean dust from vents and fans using compressed air.
Ensure your Mini PC has adequate space around it for airflow.
Consider using a cooling pad or elevated stand to improve bottom ventilation.
Monitor temperatures using software like HWMonitor to identify potential issues early.
By implementing these cooling solutions and maintenance practices, you can ensure your Mini PC runs efficiently and reliably even during demanding tasks.
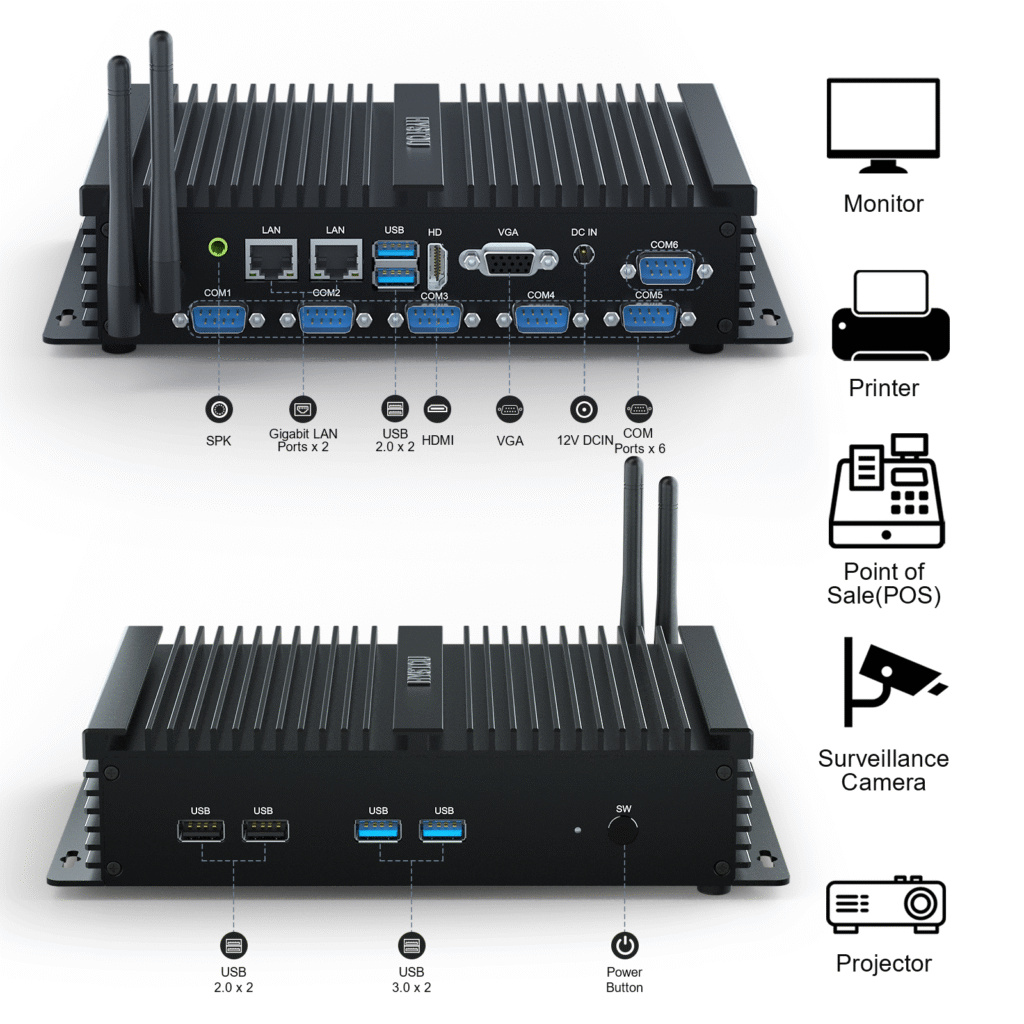
Mini PC Port Expansion: Maximizing Connectivity
A common challenge with mini computers is limited built-in ports. However, connectivity options can be significantly expanded with the right accessories. HYSTOU Mini PCs come equipped with multiple integrated interfaces, delivering exceptional expandability and flexibility for diverse usage scenarios.
USB-C Docking Stations: Your All-in-One Solution
A high-quality USB-C dock can transform your Mini PC into a full-featured workstation. Look for docks with the following ports:
Multiple USB-A and USB-C ports
HDMI or DisplayPort outputs for external monitors
Ethernet port for stable network connectivity
SD card reader
Audio jacks
Top USB-C Docks for Mini PCs:
Anker PowerExpand 12-in-1 USB-C Dock
Belkin Thunderbolt 3 Dock Pro
Plugable USB-C Triple Display Docking Station
PCIe Expansion Cards
For Mini PCs with available PCIe slots, consider these expansion options:
USB 3.0 Expansion Cards
Add multiple USB-A ports for legacy peripherals.
Network Cards
Upgrade to 10Gbps Ethernet or Wi-Fi 6 for faster networking.
Video Capture Cards
Ideal for content creators needing to connect cameras or gaming consoles.
Wireless Expansion Options
Bluetooth Adapters
Add Bluetooth connectivity using a small USB dongle.
Wi-Fi Range Extenders
Improve wireless signal strength without opening your Mini PC.
Wireless Display Adapters
Miracast or Chromecast devices can add wireless display capabilities.
Creative Solutions for Limited Space
VESA Mounts: Attach your Mini PC to the back of a monitor to save desk space.
Cable Management: Use cable clips or sleeves to keep your expanded setup organized.
USB Hubs: Stackable USB hubs can provide additional ports without占据 too much space.
By strategically selecting the right expansion options, you can customize your Mini PC setup to meet your specific needs while maintaining the compact footprint that makes Mini PCs so appealing.
Mini PC Maintenance Checklist: Keeping Your Device in Top Shape
Regular maintenance is key to ensuring your Mini PC runs smoothly and lasts for years to come. Follow this comprehensive checklist to keep your device in optimal condition.
Weekly Maintenance Tasks
Clean Up Temporary Files
Use Disk Cleanup (Windows) or CleanMyMac (macOS) to remove unnecessary files.
Clear browser cache and cookies for improved performance.
Update Antivirus Definitions
Ensure your security software has the latest virus definitions.
Perform a quick scan to check for potential threats.
Check for Software Updates
Install operating system updates.
Update essential applications like web browsers and productivity software.
Monthly Maintenance Tasks
Full System Scan
Run a comprehensive antivirus and malware scan.
Check for disk errors using built-in tools (Error Checking in Windows, Disk Utility in macOS).
Organize Files and Folders
Delete unused applications and files.
Organize remaining files into a logical folder structure.
Consider moving large files to external storage if drive space is limited.
Clean Peripherals
Wipe down your keyboard and mouse with a microfiber cloth.
Clean monitor screens using appropriate cleaning solutions.
Quarterly Maintenance Tasks
Dust Removal
Power off your Mini PC and unplug all cables.
Use compressed air to clean dust from vents and fans.
If comfortable, open the case and clean internal components.
Check for Physical Damage
Inspect cables for fraying or damage.
Check ports for bent pins or debris.
Ensure all screws are tight and secure.
Backup Verification
Test your backup system to ensure files can be successfully restored.
Consider rotating backup media for added security.
Annual Maintenance Tasks
Thermal Paste Replacement
If you notice increased temperatures, replace CPU thermal paste.
This is especially important for Mini PCs over 2 years old.
Battery Check (if applicable)
For Mini PCs with internal batteries, check capacity and performance.
Replace batteries that no longer hold a charge effectively.
Performance Evaluation
Benchmark your system to compare with original performance.
Consider hardware upgrades if performance is significantly degraded.
Long-Term Maintenance Strategies
Document Your Setup
Keep a record of your Mini PC specifications and upgrades.
Save driver installation files for quick access if needed.
Create Recovery Media
Prepare a bootable USB drive with recovery tools.
Create system restore points before major updates or changes.
Monitor Hardware Health
Use tools like CrystalDiskInfo to monitor SSD/HDD health.
Keep an eye on CPU and GPU temperatures during normal operation.
By following this maintenance checklist, you can significantly extend the lifespan of your Mini PC and ensure it continues to perform at its best. Regular maintenance not only prevents unexpected failures but also helps maintain optimal performance for all your computing needs.
Conclusion: Your Mini PC, Your Digital Workhorse
Your Mini PC is more than just a compact computing device; it’s a versatile tool that can adapt to your changing needs with the right maintenance and upgrades. By following the guidelines in this comprehensive guide, you can:
Maximize Performance: Through strategic RAM and SSD upgrades tailored to your specific usage patterns.
Extend Lifespan: Regular maintenance and proper cooling will keep your Mini PC running smoothly for years.
Enhance Connectivity: Utilize the latest docking solutions and expansion options to turn your compact device into a full-featured workstation.
Ensure Reliability: Proactive troubleshooting and component checks can prevent unexpected downtime.
Remember, the key to getting the most out of your Mini PC is understanding its capabilities and limitations. With the right approach to upgrades and maintenance, your compact computing solution can continue to meet your needs long into the future.
Certainly, you should know that HYSTOU provides a 3-year limited warranty service for each mini computer, starting from the date of purchase. Any issues you encounter with your Mini PC can be addressed by contacting us. Our dedicated professional support team is available around the clock to meet your needs, allowing you to sit back, relax, and fully enjoy your mini computer experience.

HYSTOU
HYSTOU has established its R&D headquarters in Shenzhen, drawing on over a decade of experience. Our core team members, who previously served at renowned companies such as Inventec and Quanta Computer, form the backbone of our technical expertise. With robust R&D and innovation capabilities, we remain steadfast in our commitment to pursuing excellence in the field of technology products.