How to Install Windows 11 on Unsupported Hardware: Bypass TPM 2.0 and Secure Boot Restrictions (2025 Guide)
Preparation: Download Required Tools
Before starting the installation process, you need to prepare two essential components. First, download the latest Windows 11 ISO file from the official Microsoft website. Make sure to select the correct edition and language for your needs. Second, you’ll need a reliable USB flash drive with at least 8 GB of storage capacity. Remember that this drive will be formatted during the process, so back up any important data beforehand.
The key tool for bypassing hardware restrictions is Rufus, a free and open-source utility for creating bootable USB drives. Download Rufus 4.1 or a later version from the Rufus official website. This version includes critical updates that enable TPM 2.0 and Secure Boot bypass functionality for Windows 11 installations.

Create Installation Media with Rufus
Launch Rufus and insert your USB flash drive into the computer. The software should automatically detect the drive. If not, use the “Device” dropdown menu to select it manually. Next, click on the “Select” button and navigate to the location where you saved the Windows 11 ISO file.
In the “Partition scheme” section, choose “GPT” if your system uses UEFI, or “MBR” for legacy BIOS. For most modern computers, GPT is recommended. Under “Target system,” select “UEFI (non-CSM)” to ensure compatibility with newer hardware configurations.
[Verified] The critical step for bypassing restrictions is enabling the “Skip TPM check” and “Skip Secure Boot check” options in the “Advanced drive properties” section. These options are only available in Rufus 4.1 and later versions. Double-check that these boxes are checked before proceeding.

Click “Start” to begin creating the bootable drive. A warning message will appear, notifying you that all data on the USB drive will be destroyed. Confirm this action and wait for the process to complete, which typically takes 5-10 minutes depending on your system and USB drive speed.
System Installation: Bypass TPM and Secure Boot Errors
With your bootable USB drive ready, restart your computer and enter the BIOS/UEFI setup. The method for accessing BIOS varies by manufacturer, but common keys include F2, F12, Delete, or Esc pressed during startup. Once in the BIOS, disable Secure Boot if it’s enabled, and ensure that USB boot is prioritized in the boot order.
Save your changes and exit the BIOS. Your computer should now boot from the USB drive and launch the Windows 11 installation process. You’ll first see the Windows Setup screen, where you can select your language, time and currency format, and keyboard input method.
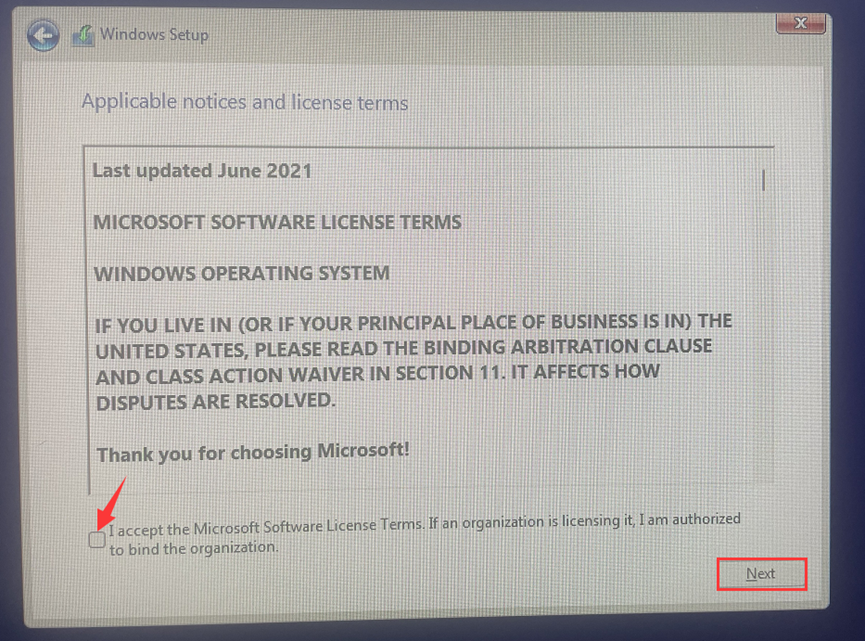
Click “Next” and then “Install now” to proceed. When prompted for a product key, you can either enter it now or select “I don’t have a product key” to activate later. Choose the edition of Windows 11 you want to install and accept the license terms.
At this point, you might encounter the “This PC can’t run Windows 11” error message, which indicates that your computer doesn’t meet the official hardware requirements. This is where the Rufus bypass comes into play.
Don’t panic—this is expected behavior. Simply click “OK” and then “Back” to return to the previous screen. Select the “Custom: Install Windows only (advanced)” option. You’ll now see a list of your computer’s drives and partitions. Choose the partition where you want to install Windows 11, or select “Unallocated Space” if you’re setting up a new drive.
Select custom installation option
Click “Next” to begin the installation. The setup process will copy files, install features, and update components. Your computer will restart several times during this process, which is normal.

Post-Installation Setup and Configuration
After the final restart, you’ll be guided through the Windows 11 out-of-box experience. First, select your region and keyboard layout. You can add a second keyboard layout if needed, or skip this step for now.

Select your region

Choose keyboard layout
Next, you’ll encounter the network setup screen. It’s recommended to disconnect from the internet at this point by selecting “I don’t have internet” in the bottom-left corner. This bypasses the Microsoft account requirement and allows you to create a local account, which is particularly useful for unsupported hardware configurations.
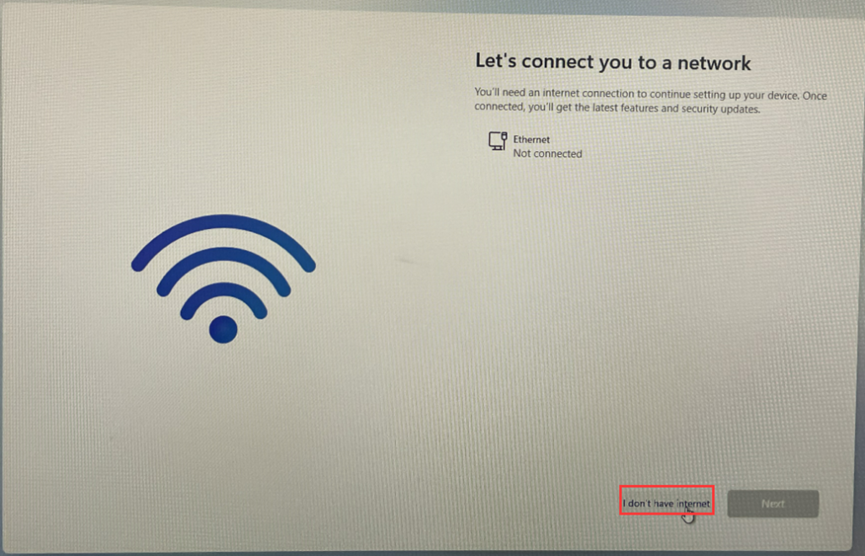
Select the offline setup option.
Select “Continue with limited setup” and then enter your desired username for the local account. You can create a password later if you wish. Review the privacy settings and customize them according to your preferences. Windows will then finalize your settings and take you to the desktop.
Once you’re on the desktop, it’s crucial to install the latest drivers for your hardware. Visit your computer manufacturer’s website to download drivers specific to your model. Pay special attention to the chipset, graphics, and network drivers to ensure optimal performance.
Finally, check for Windows updates by going to Settings > Windows Update > Check for updates. Microsoft frequently releases patches that improve compatibility with older hardware. Install all available updates and restart your computer if prompted.
By following these steps, you’ve successfully installed Windows 11 on unsupported hardware while maintaining system stability and security. Remember that while this method bypasses certain hardware checks, it’s always recommended to use hardware that meets Microsoft’s official requirements for the best experience.

HYSTOU
HYSTOU has established its R&D headquarters in Shenzhen, drawing on over a decade of experience. Our core team members, who previously served at renowned companies such as Inventec and Quanta Computer, form the backbone of our technical expertise. With robust R&D and innovation capabilities, we remain steadfast in our commitment to pursuing excellence in the field of technology products.